• Skip to primary navigation
  • Skip to main content
  • Skip to primary sidebar
  • Skip to footer
  • Retreats, Classes & Events
  • Work with me
  • Blog
  • Recipes
  • Private Events
  • Corporate Wellness

happy eats healthy

being healthy is finally delicious!


Healthy Chicago Cooking Classes

dairy free

Orange Broccoli Pesto

Orange Broccoli Pepita Pesto {df, gf, v}

Change up your pesto by using one of the most powerful superfoods available broccoli. The Vitamin C and the sulforaphane in broccoli make it a great antihistamine vegetable to add to your diet.

Blanching the broccoli first helps to break down the enzymes, making it more digestible, and will help it keep a bright green color. I do recommend taking the extra few minutes to do this step.

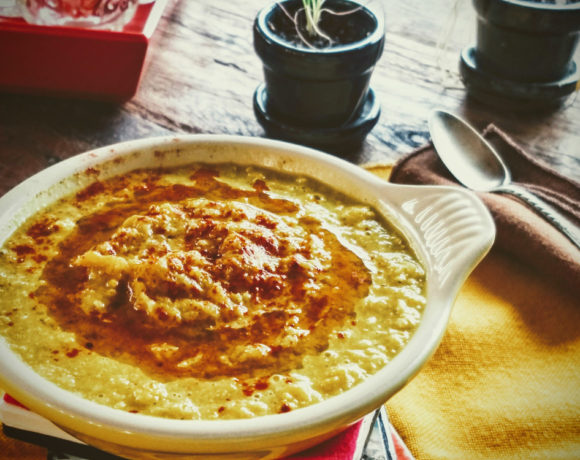
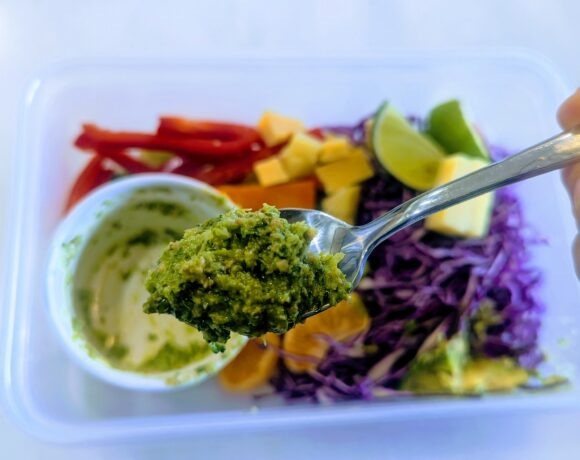
This Orange Broccoli Pepita Pesto is dairy-free, gluten-free and is fun wherever you would use classic pesto including as a sandwich spread, over roasted veggies, or just as a dip.
Happy Eating,
~Monique

Orange Broccoli Pepita Pesto

1 heaping cup broccoli pieces
1/2 cup fresh basil
1/4 cup toasted pumpkin seeds
2-4 tbls extra-virgin olive oil
1 orange, zest and juice (at least 2 tbls juice)
1 large garlic clove, smashed & roughly chopped
1/2 tsp pink or salt

Bring a medium pot of water to a boil and place a bowl of ice water nearby. Blanch the broccoli in the boiling water for 30 seconds. Use a slotted spoon to scoop it into the ice water to stop the cooking process. Drain.

Place the broccoli into a food processor with the basil, pumpkin seeds, orange zest and juice, garlic, salt and 2 tablespoons of olive oil. Pulse until well combined adding additional olive oil as needed to get to desired consistency. Adust salt to taste.

homemade soup recipe

Roasted & Spiced Cauliflower Soup

Is there anything cauliflower can’t do? I love the versatility of vegetable, but also don’t want to forget about the classics- like soup. Like this Roasted Cauliflower Soup.

This is a super easy recipe that is mostly hands off thanks to roasting the cauliflower with all the spices. Just pop it in the blender and it’s good to go. No onions or garlic either so it’s a great option for anyone following a FODMAP diet- but you could add them and roast with the cauliflower if you wanted to.


Happy Eats,

Monique


Roasted & Spiced Cauliflower Soup

1 head of cauliflower (roughly 5-6 cups )

1 tbls olive oil

1 tsp ground cumin

1 tsp ground coriander

1 tsp pink Himalayan or sea salt

1/2 tsp ground ginger

1/2 tsp ground turmeric

1/4 tsp ground cinnamon

1/8 tsp pepper

Juice of 1 orange


Preheat the oven to 400 degrees and line a baking pan with parchment paper.

Break the cauliflower into smaller florets and toss with the olive oil and all the seasonings. Roast in the oven for about 30 minutes or until desired texture is reached.

Cool slightly and place in a blender along with the orange. Add a smidge of water as needed to blend.

NOTES: I really like this soup to have texture, so blend on a low speed to keep this more chunky and hearty. Blend on high if you want it more smooth.

Sweet Potato Tortilla

Quick Gluten Free Sweet Potato Flatbread (think tortilla!)

Gluten Free Sweet Potato Flatbread: don’t adjust your monitor, that purple color is the real deal. No filters or added colors.

Purple sweet potatoes have been plentiful at the markets lately and I just can’t resist them. It’s not often we get to cook with that much deep, vibrant purple.  But, a classic orange sweet potato is going to look great in these too.

I created these quick, yeast-free homemade flatbreads (aka tortillas) on a whim after bread was requested to go with our soup the other day. I pulled the first two off the pan in the same amount of time as it took to cook the soup. For a complete first try, they are pretty darn good! We even used the extras later that day as the bread for a grilled cheese. Think of these gluten free quick breads as a cross between a flatbread, a tortilla and a cracker- each version just gets cooked slightly longer than the previous.

Give them a try and remember to share them on your social media, tagging #HappyEatsHealthy on FB, IB & Twitter!

Happy Eats,
~Monique

Gluten Free Sweet Potato Flatbread

1 small sweet potato, baked or steamed

1/2 cup gf flour (I used Bob’s Red Mill)

1/4 cup arrowroot powder

1 tsp salt

1 tsp baking powder

1 tbls oil

~1-3 tbls water

Remove the skin from the sweet potato and smash well with a fork. Add the remaining ingredients, except the water, and mix well using your hands. Keep kneading it into a ball, Adding 1 tablespoon of water at a time if needed just to bring it all together.

Pull the dough into small rounds, about 8 – 12 of them depending on the size of your original potato.

Heat a skillet over medium heat. Roll out one ball between two sheets of parchment paper. Carefully pull the top sheet off from your tortilla. Flip it onto your hand, or directly into the pan, then carefully pull the remaining parchment away.

Cook the flatbread until it becomes lightly browned on one side, them flip to cook the other side. If you want this to be soft, remove it from the skillet. It you want a crunch tortilla, let it cook until deeply browned, then remove and enjoy.

Optional: try adding a few seasonings for different flavors:

  • minced garlic + onion
  • chili powder +  cumin
  • Sesame seeds
garlic baked sweet potato

Garlicky Hasselback Sweet Potato

Hasselback Sweet Potato is the best thing that’s happened to sweet potatoes since… well, actually, I love sweet potatoes so it’s just another really great way to prepare them. Plan for them to bake a long time, but the reward is a crispy outside and creamy inside. ~monique

Hasselback Sweet Potato

1 sweet potato

1 garlic clove

1 tbls of ghee, olive oil or grassfed buttter

Salt and pepper

Preparing the hasselback potato

Preparing the hasselback potato

Preheat the oven to 400 degrees.

Slice the potato into thin slices, being careful to not slice all the way to the bottom of the potato. Slice the garlic into thin slices. Slide the garlic slices into the slits.

Place the potato on a small pan or pie tin. Spread the ghee over the top. Sprinkle with salt and pepper.

Bake for 45-60 minutes until the outside of the potato is crisp and the inside is tender.

Top: Try topping with a few fresh chives or try my Cauliflower Cheese Sauce or  Cashew Bechamel Sauce


Tips: Place a chopstick on each side of the potato when you are slicing through it, this will help keep from slicing all the way through the potato.  

Cashew Cheese Sauce

Cashew Bechamel Sauce

A creamy, delectable, ‘cheesy’ bechamel sauce made from cashews and nutritional yeast. It’s sunning and you’ll never miss the dairy! This cashew cheese sauce is great on EVERYTHING (like my Chorizo Stuffed Squash). Trust me!

~Monique

Cashew Bechamel Sauce

1 cup soaked cashews

2 tbls olive oil

1/2 onion, diced

3-4 garlic cloves

1 celery stick

1 tbls dijon mustard

1/4 cup lemon juice

1/3  cup nutritional yeast

2-4 cups broth or water

1 tsp salt

1/2 tsp pepper

Heat 1 tbls of oil over medium heat, add the onions and saute 5 minutes. Add in the celery and saute another 5 minutes, the onions should be becoming browned. Add the garlic in and saute for another minute or two. Remove from heat.

Place the  onion mixture in the blender with the soaked cashews, remaining olive oil, mustard, lemon juice, nutritional yeast, salt, pepper and 2 cups of broth or water. Blend on high until creamy and warm. Add additional liquid as needed to reach desired consistency. Taste and adjust as needed.

NOTE: Be careful of heating cashew sauces in a pan, they become very thick and burn quickly. I like to use them straight from the blender. But if you need to re-heat the sauce, do it on low temperature and stir constantly. Stop before boiling. 

sausage stuffed summer squash

Chorizo Sausage-Stuffed Summer Squash

Take your summer squash up a knotch by making a sausage-stuffed summer squash using chorizo. Guaranteed to fill you up and taste amazing.  I created it dairy free, but give you an option to top with cheese based on your preference.

Enjoy!

~Monique


Chorizo Stuffed Summer Sausage

4 large yellow summer squash or zucchini

4 chorizo sausages

2 tbls olive or avocado oil or ghee

1 small onion, diced

3 garlic cloves, minced

2 celery sticks, diced

1 tbls fresh thyme

Salt and pepper

Cashew Bechamel Sauce

Optional: edible flowers, cheese

Remove the sausages from the casing and saute until cook, using a wooden spoon to break up the meat. Remove from pan and set aside. Remove an extra grease from pan as well.

While the meat is cooking. Cut the squash in half lengwise and scoop out the insides (saving this for the stuffing), leaving just enough flesh for the squash to retain their shape.

Rub the squash with 1 tbls of oil, season well with salt and pepper. Grill (or roast) the squash until just fork tender.

Dice the onions and celery and mince the garlic. Also dice up insides of the squash.

Heat remaining oil over medium high heat, add the diced onions and celery. Cook for about 5 minutes just to soften. Add in the garlic and the diced squash and a good sprinkling of salt and pepper. Cook another 5 minutes until the squash is lightly sauted. Add back in the chorizo nd the fresh thyme and toss well. If the pan is super dry, add a couple tablespoons of water.  Taste and add additional salt and pepper as needed.

Place each squash on a platter and fill each with the chorizo filling.

Drizzle with my creamy , ‘cheesy’ Cashew Bechamel sauce. Top with edible flowers. Enjoy while warm.

Optional: Or top with a bit of cheese, then place under the oven broiler for a couple minutes to melt the cheese.

ice cream with roasted bananas

Roasted Banana Ice Cream

Banana ‘nice’ cream is all the rage and I totally understand why. It’s simple and delicious. But my Roasted Banana Ice Cream takes that concept to the next creamy, dreamy level. It’s dairy free though you would never know it by the texture.

2 bananas, sliced

1 tsp cinnamon

1/4 cup + 1 tbls brown coconut sugar

2 tsp vanilla

1 can full fat coconut milk

1 can full fat coconut milk, cream only (save the water-like liquid for another use)*

roasted bananas for ice cream

Cinnamon roasted bananas

Directions:

Preheat the oven to 400 degrees.

Slice the bananas about 1″ thick and place close together on a parchment lined sheet pan. Sprinkle with the cinnamon and 1 tbls coconut sugar. Roast for 20 minutes. Remove from oven and cool.

Blend the cooled bananas with remaining coconut sugar and vanilla until creamy.

To the blender add the coconut milk, blend until mixed and smooth. I then place the mixture in fridge to chill and allow the flavors to meld a bit more, 2 hours up to overnight. Skip this step if you don’t have time.

Process in ice cream maker and enjoy immediately.

*It helps to place one can of coconut milk in the fridge overnight. Open the can and scoop out the thick cream from the top of the can, leaving the the water-like liquid for another use.

*The roasted bananas give a deep sweetness to this nice cream, but if you like ice cream a little sweeter; add a few more tablespoons of coconut sugar

*Works best if you have an ice cream maker, but you could freeze this in a loaf pan, it will be just a touch icy. Or freeze in ice cube trays, then pop them into the blender until creamy.

Dairy Free Sweet Potato Ice Cream

Cooking Time
30 seconds to blend

Ingredients
2/3 cup banana, diced and frozen

2/3 cup cooked sweet potato, diced and frozen

1/2 cup coconut milk

2 tsp chopped ginger

Directions
Place all the ingredients in the blender and blend until smooth and creamy. You may need to stop and scrape the sides down, add in a little more milk if needed to blend, but be careful not to add in too much in, or to blend to long, or your ice cream will be soupy.

Enjoy with a sprinkle of cardamom on top.

Serves 2.

Notes
Using frozen banana not only makes this ‘ice cream’ creamy but adds sweetness too. If you want it a little sweeter, add a teaspoon or two of maple syrup.

Primary Sidebar

Search

Things I Like

Branch Basics Coupon

Can your toxic-free cleaner do all this?

Picture this: I tried out yet another ...

Keep reading

footprints

the importance of remembering how far you’ve come

Remembering how far you've come can be ...

Keep reading

Check out all the things I like

Your chef

Monique Costello Happy Eats Healthy Chef

About Us

Want to find your happy? You hold the key!

Happy Eats Healthy exists to help others learn about and incorporate the healing power of clean foods in their lifestyle while experiencing how delicious healthy can be. Also, cooking and eating and socializing are FUN!

> LEARN MORE

Private Events

Happy Eats Healthy Private Events

Hosting a private event?

Don’t stress, we’ll cook for you!

> LEARN MORE

Recent Posts

  • Walnut, Sundried Tomato and Lentil Burger {v, gf}
  • Cooked Quinoa Flatbreads ~from leftover quinoa! {V, GF}
  • Summer Rainbow Quinoa Salad {gf, v}
  • Avocado Black Bean Salsa Salad {gf, v}
  • Mini Dark Chocolate Fudge Mousse Cake {df, gf}

Read by category

  • Apps & Snacks
  • baking
  • Beauty
  • blogging
  • Bread
  • Breakfast
  • Breakfast
  • Dairy-Free
  • Dessert
  • Detox
  • Drinks & Cocktails
  • Fall
  • Fermentation
  • from scratch
  • Gluten-Free
  • Happy Eats Healthy
  • Home
  • Kitchen
  • Main
  • Meats & Fish
  • Paleo
  • Recipes
  • Salads
  • Sauces
  • Season
  • Self Care
  • Sides
  • Skin Care
  • soap
  • Soups
  • Special Diets
  • Spring
  • Summer
  • Super Foods
  • Supplements
  • Sweets
  • Things I Like
  • Tools
  • Tutorials
  • vegan
  • Vegan
  • vegetarian
  • Vegetarian
  • Veggies
  • Winter

Archives

Footer

Join the Party

  • Facebook
  • Instagram
  • Pinterest
  • Twitter
  • YouTube

More to Explore

  • About Us
  • Things I Like
  • Happy Clients
  • Contact

Want More Monique?

Visit her here

Copyright © 2023 · Happy Eats Healthy · All Rights Reserved