• Skip to primary navigation
  • Skip to main content
  • Skip to primary sidebar
  • Skip to footer
  • Retreats, Classes & Events
  • Work with me
  • Blog
  • Recipes
  • Private Events
  • Corporate Wellness

happy eats healthy

being healthy is finally delicious!


Healthy Chicago Cooking Classes

Apps & Snacks

Roasted Tomato, Goat Cheese and Nectarine Appetizer

Prep Time
5 minutes

Prep Notes
Cooking Time
20 minutes

Ingredients
Cherry or small tomatoes

Red onion, a few thin slices

Garlic, 1-2 cloves minced

Nectarine, cut into about 8 slices

Goat cheese

Olive oil

Fresh black pepper and coarse sea salt

Directions
Preheat oven to 400 degrees.

Toss the tomatoes, garlic and red onion with a drizzle of olive oil, bake about 20 minutes or just until the tomatoes begin to burst. Remove from oven and toss in the nectarines.

On a serving tray, lay the goat cheese in the middle. Spoon the roasted tomatoes and nectarines over the cheese. Add a pinch of coarse sea salt and fresh black pepper.

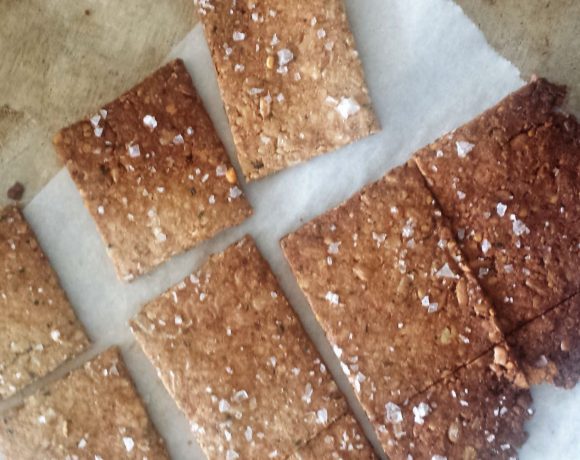
Serve with crackers.

Mushroom Bacon

Ingredients
1 king oyster mushroom (see note below for using shiitake mushrooms)

4 tbls avocado oil (or melted coconut oil)

4 tsp maple syrup

1.5 tsp smoky paprika

Good pinch of coarse sea salt

Directions
Preheat oven to 350 degrees. Line a baking sheet with parchment paper.

Cut the mushrooms into lengthwise slices, very thin.

Toss the mushroom slices with the remaining ingredients. Place on a single layer on the baking sheet. Bake for about 15 minutes, flip and bake another 15 or until crispy. Remove from oven and let cool, they will crisp some as they cool. Some pieces may get done sooner than others, keep a close on on them after flipping.

Enjoy immediately. Store in the fridge at an air tight container- place back in the oven to re-crisp as needed

Notes
The king oyster mushroom is the only mushroom that allows for big, long slices which really replicate a full slices of bacon with both crispy and chewy factors. I’ve also done this with shiitake mushrooms, they come out as small pieces- more like little bacon bits, still great flavor and fun to top anything.

Healthy, Toasted Coconut Puppy Chow

Cooking Time
5 minutes

Ingredients
3/4 cups sliced almonds

1/2 cup toasted coconut flakes

1/4 cup almond butter

1/4 cup coconut oil

2 tbls raw cacao powder

4-6 drops stevia

1/4 tsp salt

2/3 cup coconut sugar

1/4 cup arrowroot powder

Directions
Place the coconut sugar in a food processor or blender, chop and whirl to create a more superfine powder. Leave the top on and let that rest (or the powder dust will escape and have you coughing up a storm!)

Melt together the coconut oil, cacao powder, stevia and salt. Add and mix in the almond butter. Place the almonds and toasted coconut flakes in a sealable glass tupperware container, pour in the melted mixture and toss well to ensure everything is coated. Add the coconut sugar, cover and shake to coat. Now add the arrowroot powder, cover and shake well. If the chocolate is too moist and keeps absorbing the arrowroot powder, set the dish in a the fridge for about 10 minutes to help the chocolate firm up, then add a bit more powder and shake. Store in the fridge for best freshness.

Enjoy!

Notes
My version of puppy chow has all the flavor without all the chemicals and fat. It’s chocolatey, creamy and crunchy. Some of the almonds and coconut will stick together, which helps to great a little crunch like you would get if you made this with cereal.

Using raw cacao powder offers a ton of minerals like magnesium, iron and calcium because it’s much less processed than cocoa powder. The coconut sugar is a little less sweet than white, processed sugar, it’s lower on the glycemic index (so won’t give you that sugar rush white does) and it retains more nutrients too. Arrowroot coats the whole thing with white powder, so you get the same effect as powder sugar.

Perfect for a little pick me up anytime and great as a Holiday gift- just place in a cute jar and add a ribbon and a label.

Grilled Fig: Stuffed with Blue Cheese and Wrapped in Prosciutto

Prep Time
5 minutes

Prep Notes
Cooking Time
10 minutes

Ingredients
Fresh Figs

Blue Cheese

Thin Prosciutto Slices

Directions
Heat the grill.

Cut an ‘X’ in the top of the figs, keeping the lower half of the fig intact. Stuff with pieces or hunks of blue cheese. Wrap the fig with a slice or two of proscuitto.

Place directly onto the grill until the the prosciutto is crispy.

Enjoy as is or set atop a bed of fresh arugula tossed with extra virgin olive oil.

Garlic Cashew ‘Cheese’ Dip

Prep Time: 

Cook Time: 

Ingredients
Garlic Cashew Cheese Dip

2 garlic cloves
2 tbls lemon juice
2 tbls nutritional yeast
1 tsp apple cider vinegar
1/4 cup water~ more as needed
scant tsp salt
1 heaping cup cashews, soaked 2 hours

Directions
Soak cashew in water for up to 4 hours. Strain and rinse well.
Place all ingredients, except for cashews in a blender and blend until smooth.
Add the cashew and blend again until smooth. Add more water as needed to get the mixture to blend smooth.

Can use immediately but I find it best after chilling a few hours to a day.
*Add more water to turn this into a dressing, or less water if you want it to be a much thicker dip.

GF Sunflower Cracker

Cooking Time
15-20 minutes

Ingredients
1 tbls ground flax seed

3 tbls water

1/2 cup walnuts

1/2 cup sunflower seeds

1 tbls hemp seeds

2 tbls coconut flour

Coarse salt

Optional seasonings

Directions
Preheat the oven to 350 degrees. Set a sheet pan in the oven while it heats up.

Soak the ground flax seed in the water for at least 10-20 minutes.

In a blender or small food processor blend together the sunflower seeds and walnuts, not to a full powder but just to chop finely. Add in the soaked flax seed, coconut flour and hemp hearts, blend to combine. The mixture should come together to a ball. If the dough seems a little dry, add in just a teaspoon or two of water.

Set the dough between two pieces of parchment paper and roll out to desired thickness-I make them fairly thin; try these at about a thickness between a triscuit and a wheat thin cracker. Use a knife or a pizza cutter to make cuts through the dough to the size cracker you want. I tend to use the size of a wheat thin again as my template. Sprinkle with coarse salt and any other seasonings (cumin, rosemary, oregano, etc.)

Place the parchment and marked crackers on the hot sheet tray and bake for 15-25 minutes, until crunchy. They will crunch up a bit once out of the oven and you may want to take the outer edge pieces out before the inner pieces.

Notes
I like this cracker for it’s more delicate, softer texture; it’s a great gluten free option for those time you need a little snack. It comes together in no time. Stores in the freezer well too!

Cumin Salsa

Cumin Salsa

Prep Time: 

Cook Time

Ingredients
1 white onion

2 tomatoes

juice of 1 lime

1/2 jalapeno

1 tsp ground cumin

1/2 tsp salt

1/2 tsp ground coriander

1 Tbls fresh oregano

Directions
Finely dice the onion, place half in a blender and set the other half in a bowl. Chop one tomato and add to the onion bowl. Rough chop the other and place in the blender.

Add the remaining ingredients to the blender and pulse a few times to combine and break everything down. Pour into the bowl with the diced onions and tomatoes. Stir to combine. Enjoy.

Crunchy Lotus Root Chips

Cooking Time
10-20 minutes

Ingredients
1 lotus root

1 tbls oil (avocado, olive or melted coconut oil)

Sea salt

Black pepper

Directions
Preheat the oven to 300 degrees. Line 2 sheet trays with parchment paper.

Peel the outside of the lotus root using a vegetable peeler, chop off the ends and discard. Slice the lotus root as thin as possible, using a mandolin is recommended for consistency. Toss the slices with the oil, lay them out on the sheet trays. Add a good pinch of salt and fresh black pepper (optional). Place in the oven and bake for 10 minutes and flip.

Cook for another 10 minutes or until golden dark brown (this might even take up to 20 minutes). Keep a close eye on them as some will get done quicker than others if your oven cooks uneven and if the slices are cut uneven. They will crisp up a bit more once you remove them from the oven. So take one out and let it rest for a minute- taste for crunchiness. Use that is your guide to removing the remaining slices.

Remove them as they crisp. Store in an airtight container… if there are any left to save.

Notes
Lotus root has the texture of a potato, so it crisps up similar to a chip does. It’s great for stimulating circulation and loaded with good fiber and vitamin C. It’s a great healthy, crunchy snack instead of processed chips!

I did experiment with baking the chips faster on a higher temperature, while the chips cooked faster I found the texture of the crunch was almost too hard. My preference is a lower setting for longer time frame for the best results.

Crispy Crunchy Roasted Chickpeas

Cooking Time
2 hours

Ingredients

2 cup cooked chickpeas (or 1 can)
1/2 tbls olive oil
1 tsp ground cumin
1/2 tsp ground coriander
1/4 tsp salt
1/8 tsp ground cinnamon
a turn or two of fresh ground black pepper

Directions
Preheat the oven to 250 degrees, set a parchment-lined cookie sheet in the oven while it is heating.

Rinse chickpeas and place onto a clean kitchen towel to lightly dry off. This will help them crisp more than steam. Add the seasoning and oil to a bowl, add in the chickpeas and toss well.

Pour onto the hot cookie sheet. Place in a 250 degree oven until desired texture is reached (expect a few hours.) Remove from oven, cool and store in an airtight container.

Cheesy Miso Kale Chips

Ingredients
1 big bunch of curly kale

3/4 cup soaked cashews

4 garlic cloves

2 tbls nutritional yeast

1″ fresh turmeric

juice of 1/2 lemon

1/2 tbls miso

1/3 cup water

Directions
Wash the kale and set out to dry. If the kale is still wet it will steam rather than crisp. Try laying it on kitchen towels.

Place all the ingredients in blender, blend until smooth. Add more water if needed to blend but this should be a rather thick to stick to the kale.

Tear the kale off from the stem into chip size pieces and place in a big bowl. Pour the cheesy miso sauce over the top and mix well. Don’t massage it too long, just get the leaves covered.

Oven method: Preheat the oven to 200 degrees, or the lowest level it will go. Place the covered chips on a sheet pan and bake until dry and crispy, turning over once; should take about 2-3 hours.

Dehydrator method: Place the covered kale in the dehydrator at about 115 degree until crispy; 6-8 hours.

Store in an airtight container. If they get a little soggy, I was able to recrisp by placing back in the dehydrator for a bit.

Carrot Hummus with Egyptian Dukkah

Carrot Hummus with Egyptian Dukkah

Ingredients
2~3 cups chopped carrots

Juice of 1 lemon

1/2 tsp Himalayan pink salt

2 cloves garlic, smashed

2 tbls extra virgin olive oil

Optional Toppings

1 tbls extra virgin olive oil

2 tbls Dukkah seasoning (see my homemade recipe here)

or use Za’atar seasoning (see my Za’atar recipe here)

Directions
Rough chop the carrots, toss with drizzle of olive oil, salt and pepper. Roast in a 400 degree oven until soft and cool slightly. Don’t worry about the exact on the amount of carrots- just roast up what you have.

In a blender or food processor, add the lemon, salt, garlic and olive oil and blend/process to combine. Add in the carrots and process until preferred texture is reached. Adding a few tablespoons (up to 1/4 cup) of water can really the help this process if the mixture is too stiff for your blender.

Pour into a pretty bowl. Drizzle with the final tablespoon of olive oil and the dukkah seasoning.

Enjoy!

Raw Chocolate Energy Crunch Bites

Prep Time
10 minutes

Ingredients
4 tbls raw cacao or 3 oz dark chocolate, melted (at least 70% or higher)

1/3 cup millet

10 dates

1/3 heaping cup coconut flakes

2 tbls coconut oil

1 tsp cinnamon

Directions
Toast the millet: Heat a deep skillet over high heat, then add in the millet. Shake often, until the millet begins to ‘pop’ around the pan; should only take about 5 minutes. You will see the little grains actually pop and you will hear a snap and crackle sound. The millet will begin to get slightly brown, but it’s hard to see since it’s so small. The popping is an easier measure. Pour onto a sheet and let cool; you can set these in the fridge to help cool quicker.

In a blender or small food processor, process together the dates, coconut flakes and coconut oil to combine. Add in the millet and pulse to combine.

Use a spoon or small cookie scoop to form balls. Place the cinnamon on a shallow plate, roll the balls in the ground cinnamon.This can be a messy process, but if you scoop the ball using a small cookie scoop and drop it right in the cinnamon, roll it around a bit and then roll between your palms to get a good round shape- it’s a cleaner process.

  • « Go to Previous Page
  • Go to page 1
  • Go to page 2
  • Go to page 3
  • Go to Next Page »

Primary Sidebar

Search

Things I Like

Master Reiki in Chicago

Big Energy News: I Leveled Up to Reiki Master!

Reiki Magic Just Got Stronger. Guess ...

Keep reading

Neurographic Art

Neurographic Art is the new meditation!

As a Functional Medicine Health Coach, ...

Keep reading

Check out all the things I like

Your chef

Monique Costello Happy Eats Healthy Chef

About Us

Want to find your happy? You hold the key!

Happy Eats Healthy exists to help others learn about and incorporate the healing power of clean foods in their lifestyle while experiencing how delicious healthy can be. Also, cooking and eating and socializing are FUN!

> LEARN MORE

Private Events

Happy Eats Healthy Private Events

Hosting a private event?

Don’t stress, we’ll cook for you!

> LEARN MORE

Recent Posts

  • No-Cook Crunchy Asian Cabbage Salad {gf, v}
  • Inspire Healthy Habits at Work with Fun, Flavorful, and Healing Corporate Wellness
  • Big Energy News: I Leveled Up to Reiki Master!
  • Neurographic Art is the new meditation!
  • Mini Cinnamon Swirl Skillet Coffee Cake {gf, df}

Read by category

  • Apps & Snacks
  • baking
  • Beauty
  • blogging
  • Bread
  • Breakfast
  • Breakfast
  • Dairy-Free
  • Dessert
  • Detox
  • Drinks & Cocktails
  • Fall
  • Fermentation
  • from scratch
  • Gluten-Free
  • Happy Eats Healthy
  • Home
  • Kitchen
  • Main
  • Meats & Fish
  • Paleo
  • Recipes
  • Salads
  • Sauces
  • Season
  • Self Care
  • Sides
  • Skin Care
  • soap
  • Soups
  • Special Diets
  • Spring
  • Summer
  • Super Foods
  • Supplements
  • Sweets
  • Things I Like
  • Tools
  • Tutorials
  • Vegan
  • vegan
  • vegetarian
  • Vegetarian
  • Veggies
  • Winter

Archives

Footer

Join the Party

  • Facebook
  • Instagram
  • Pinterest
  • Twitter
  • YouTube

More to Explore

  • About Us
  • Things I Like
  • Happy Clients
  • Contact

Want More Monique?

Visit her here

Copyright © 2025 · Happy Eats Healthy · All Rights Reserved